
Appearance
输入、移动、相机
角色移动为什么要乘 Time.deltaTime?
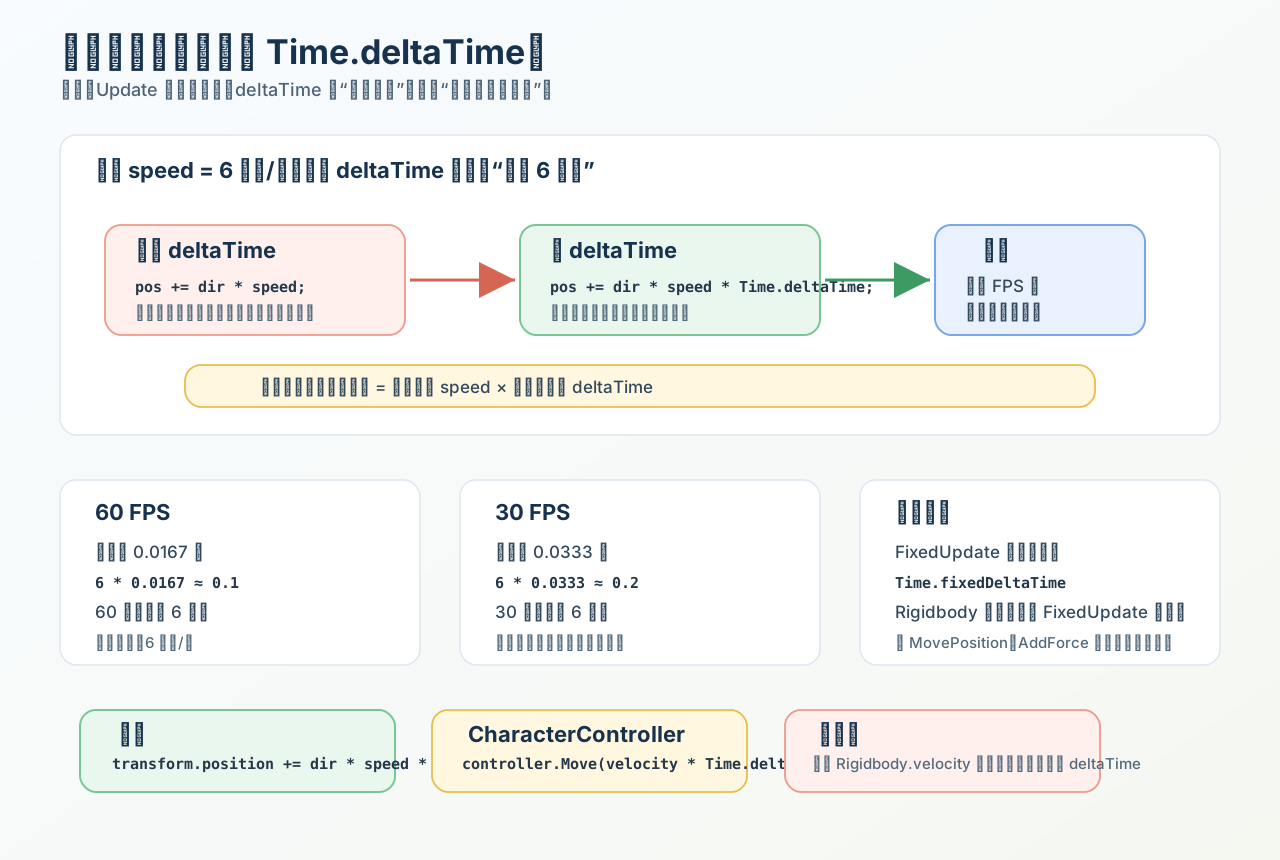
角色移动乘 Time.deltaTime,是为了把“每秒速度”换算成“这一帧该移动的距离”,让不同帧率下移动速度一致。
c
transform.position += direction * speed * Time.deltaTime;这里的含义是:
c
这一帧移动距离 = 每秒速度 × 这一帧耗时比如:
c
speed = 6f; // 每秒 6 米60 FPS 时:
c
deltaTime ≈ 0.0167
每帧移动:6 × 0.0167 ≈ 0.1
60 帧后:0.1 × 60 ≈ 630 FPS 时:
c
deltaTime ≈ 0.0333
每帧移动:6 × 0.0333 ≈ 0.2
30 帧后:0.2 × 30 ≈ 6所以无论 30 FPS 还是 60 FPS,一秒大约都走 6 个单位。
如果不乘:
c
transform.position += direction * speed;就变成了“每帧移动 6 个单位”。帧率越高,每秒执行次数越多,角色就越快。
CharacterController 常见写法:
c
Vector3 velocity = direction * speed;
controller.Move(velocity * Time.deltaTime);物理相关一般放 FixedUpdate:
c
void FixedUpdate()
{
    rb.MovePosition(rb.position + direction * speed * Time.fixedDeltaTime);
}注意:不是所有地方都要乘 deltaTime。比如直接设置速度:
c
rb.velocity = direction * speed;这里的 velocity 本身就是“每秒速度”,不要再乘 Time.deltaTime。
面试高分说法:Update 是按帧执行的,而速度通常是按秒定义的。乘 Time.deltaTime 是把连续时间里的速度积分成当前帧的位移,避免移动逻辑和帧率绑定。普通 Transform/CharacterController 移动要乘 deltaTime,物理步进用 fixedDeltaTime,但直接设置 Rigidbody.velocity 这种速度量时不要再乘。
Update 和 FixedUpdate 中分别适合处理什么输入/物理逻辑?
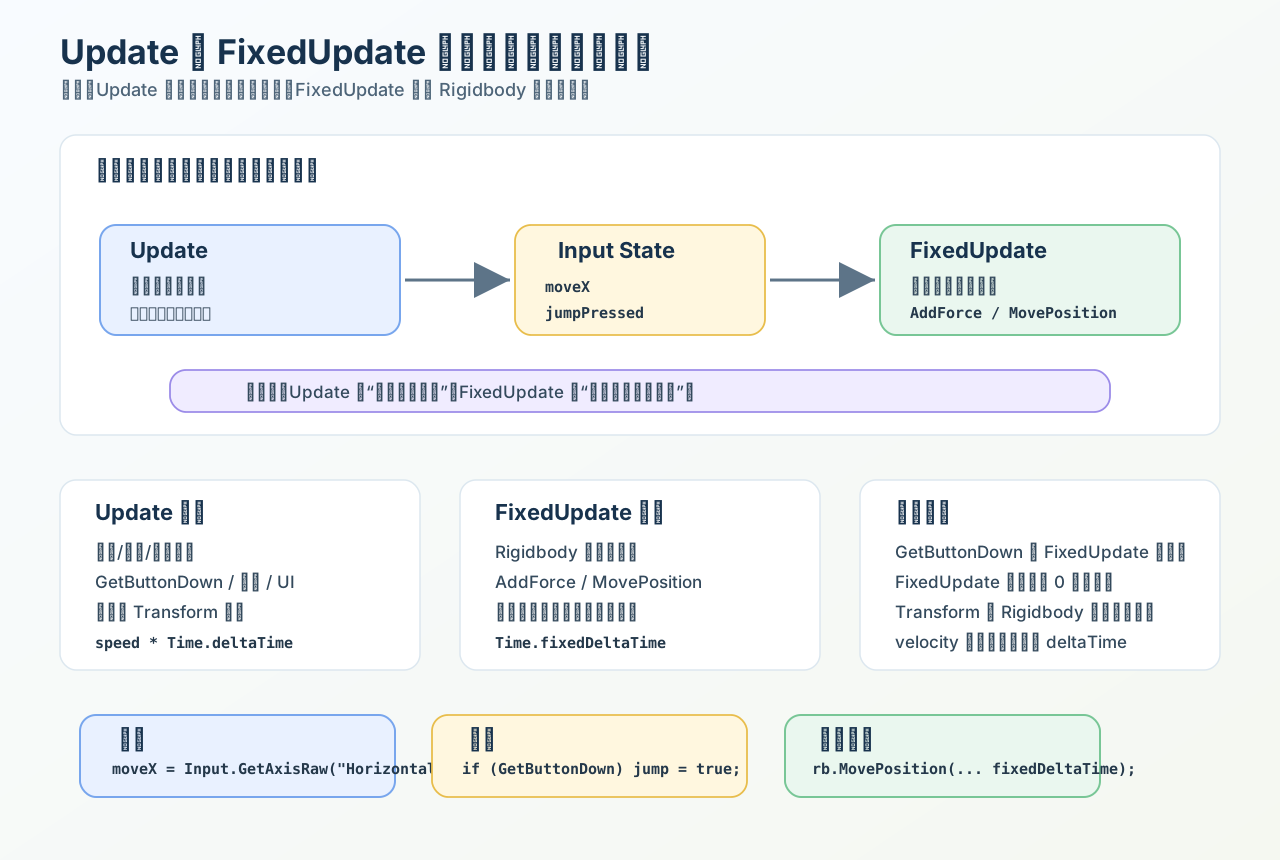
Update 适合读输入和处理普通帧逻辑;FixedUpdate 适合处理 Rigidbody 相关物理逻辑。常见做法是:Update 读输入,FixedUpdate 应用到物理。
c
private float _moveX;
private bool _jumpPressed;
private Rigidbody _rb;

void Awake()
{
    _rb = GetComponent<Rigidbody>();
}

void Update()
{
    // 读输入放 Update
    _moveX = Input.GetAxisRaw("Horizontal");

    if (Input.GetButtonDown("Jump"))
    {
        _jumpPressed = true;
    }
}

void FixedUpdate()
{
    // 物理执行放 FixedUpdate
    Vector3 velocity = new Vector3(_moveX * speed, _rb.velocity.y, 0);
    _rb.velocity = velocity;

    if (_jumpPressed)
    {
        _rb.AddForce(Vector3.up * jumpForce, ForceMode.Impulse);
        _jumpPressed = false;
    }
}为什么输入放 Update?
Update 每个渲染帧都会调用,适合捕获玩家输入,尤其是这种“只持续一帧”的输入:
c
Input.GetButtonDown("Jump")
Input.GetMouseButtonDown(0)如果放在 FixedUpdate,可能会漏,因为 FixedUpdate 不是每帧一次,它可能一帧执行 0 次、1 次或多次。
为什么物理放 FixedUpdate?
FixedUpdate 按固定时间步执行,和 Unity 物理模拟节奏一致,适合:
c
Rigidbody.AddForce
Rigidbody.MovePosition
Rigidbody.MoveRotation
物理速度设置
和物理强相关的检测/控制注意几个坑:
transform.position += ...和Rigidbody混用,可能导致物理表现异常或抖动。rb.velocity = direction * speed是设置速度,不要再乘deltaTime。rb.MovePosition(rb.position + move * speed * Time.fixedDeltaTime)这种是在算位移,所以要乘fixedDeltaTime。CharacterController不是 Rigidbody 物理,一般可以在Update里Move(velocity * Time.deltaTime)。
面试高分说法:我会把输入采样和物理执行分离。Update 负责读取输入意图,因为它跟渲染帧同步,能捕获按钮按下;FixedUpdate 负责把这个意图应用到 Rigidbody,因为它跟物理步长同步。这样既不容易漏输入,也能保持物理模拟稳定。
CharacterController 和 Rigidbody 移动区别是什么?
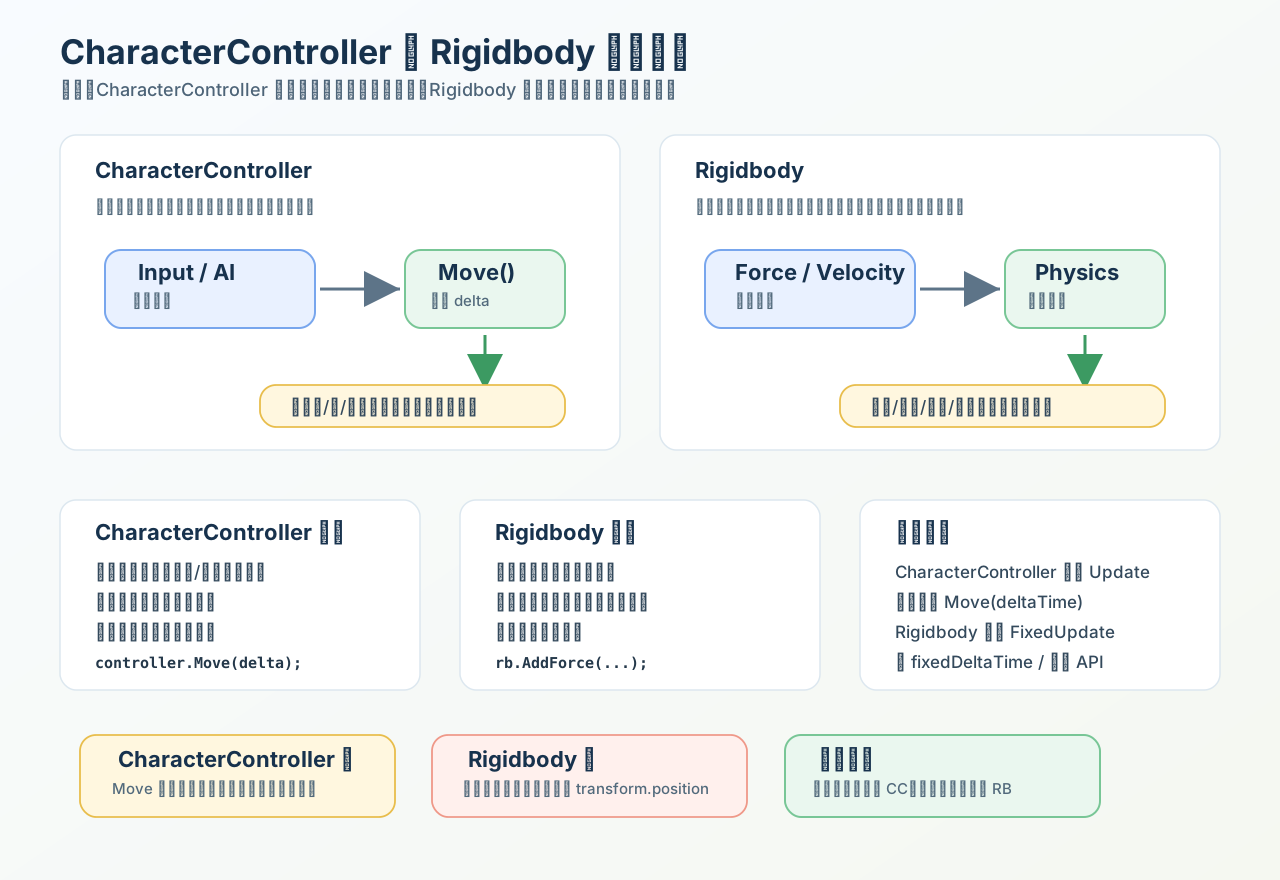
一句话:CharacterController 是“代码控制的角色胶囊碰撞器”,Rigidbody 是“交给物理引擎模拟的动力学物体”。
核心区别
| 对比点 | CharacterController | Rigidbody |
|---|---|---|
| 本质 | 带碰撞检测的角色移动组件 | 物理引擎中的刚体 |
| 移动方式 | controller.Move() / SimpleMove() | AddForce / velocity / MovePosition |
| 是否受力 | 不受力、质量、摩擦自动影响 | 受重力、质量、力、碰撞、摩擦影响 |
| 重力 | 通常要自己写 | 可由物理系统自动处理 |
| 常用时机 | Update | FixedUpdate |
| 适合 | 玩家角色、FPS/TPS、可控移动 | 箱子、球、车辆、投射物、物理互动 |
底层理解
CharacterController.Move 不是把角色当作真实刚体去积分,而是你给它一个“本帧位移”,Unity 根据胶囊体去做碰撞约束、斜坡、台阶处理,最后修正位置。所以它手感稳定、可控,但不会自然被力推动。
Rigidbody 则会进入物理世界,Unity PhysX 会根据速度、力、重力、碰撞接触点、质量等信息,在固定物理步长里更新它的位置和旋转。
c
// CharacterController:自己算速度和重力
void Update()
{
    Vector3 motion = moveDir * speed;

    verticalSpeed += Physics.gravity.y * Time.deltaTime;
    motion.y = verticalSpeed;

    controller.Move(motion * Time.deltaTime);
}
// Rigidbody:交给物理步长移动
void FixedUpdate()
{
    rb.MovePosition(rb.position + moveDir * speed * Time.fixedDeltaTime);
    // 或 rb.AddForce(force, ForceMode.Force);
}常见坑
CharacterController 不会自动吃重力,必须自己累加 y 轴速度。
Rigidbody 不建议直接改 transform.position,否则会绕开物理系统,容易导致穿透、抖动或碰撞异常。
给 rb.velocity 赋值时它本身就是“速度”,不要再乘 Time.deltaTime。
面试可以这样说:
CharacterController 更适合玩家角色,因为它是代码驱动、碰撞约束型移动,手感更稳定;Rigidbody 更适合真实物理交互对象,因为它由物理引擎根据力、质量、碰撞来模拟。角色控制优先选 CharacterController,物理反馈优先选 Rigidbody。
如何实现跳跃?
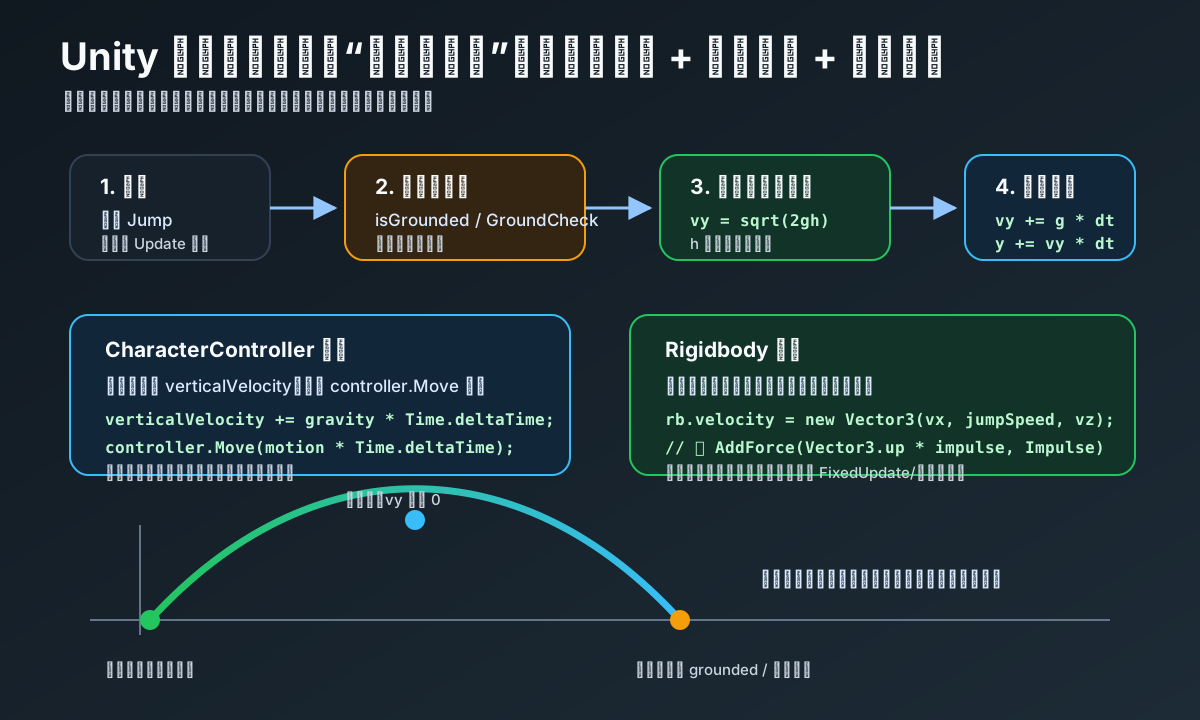
一句话:跳跃的本质不是“把角色位置往上改一下”,而是在起跳瞬间给一个向上的初速度,然后每帧/每个物理步长受重力影响下落。
核心流程
- 检测输入:玩家按下跳跃键。
- 判断是否在地面:
isGrounded/ 射线 / SphereCast。 - 给垂直速度一个向上初速度。
- 后续持续受重力影响。
- 落地后重置跳跃状态和垂直速度。
CharacterController 写法
c
public CharacterController controller;
public float moveSpeed = 5f;
public float jumpHeight = 1.5f;
public float gravity = -9.81f;

private float verticalVelocity;

void Update()
{
    bool grounded = controller.isGrounded;

    if (grounded && verticalVelocity < 0)
        verticalVelocity = -2f;

    if (grounded && Input.GetButtonDown("Jump"))
        verticalVelocity = Mathf.Sqrt(jumpHeight * -2f * gravity);

    Vector3 move = new Vector3(Input.GetAxis("Horizontal"), 0, Input.GetAxis("Vertical"));
    move = transform.TransformDirection(move) * moveSpeed;

    verticalVelocity += gravity * Time.deltaTime;
    move.y = verticalVelocity;

    controller.Move(move * Time.deltaTime);
}这里的关键公式是:
c
jumpSpeed = Mathf.Sqrt(2 * gravityAbs * jumpHeight);因为物理公式里:
c
v² = 2gh所以如果想跳到固定高度,就可以反推出起跳初速度。
Rigidbody 写法
c
public Rigidbody rb;
public float jumpSpeed = 6f;

void Update()
{
    if (isGrounded && Input.GetButtonDown("Jump"))
    {
        Vector3 v = rb.velocity;
        v.y = jumpSpeed;
        rb.velocity = v;
    }
}或者用冲量:
c
rb.AddForce(Vector3.up * jumpImpulse, ForceMode.Impulse);如果是 Rigidbody,移动和物理判断更推荐放在 FixedUpdate,输入可以在 Update 里缓存。
面试加分说法
跳跃本质是给角色一个向上的初速度,之后通过重力不断改变垂直速度,再由速度积分得到位移。CharacterController 需要自己维护重力和垂直速度;Rigidbody 则可以交给物理系统处理重力和碰撞。实际项目里还会加地面检测、跳跃缓冲、土狼时间、多段跳等机制来提升手感。
如何实现冲刺、翻滚、击退?
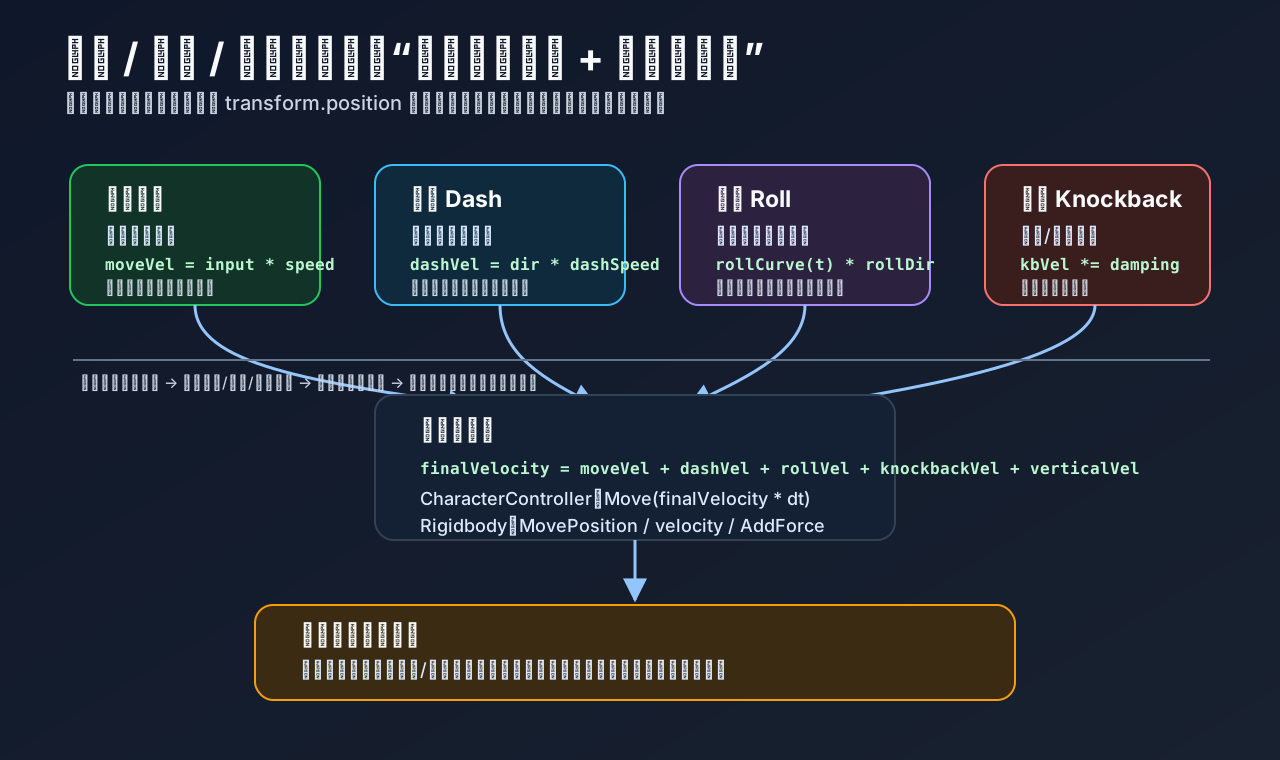
一句话:冲刺、翻滚、击退本质都是“临时速度/位移”,区别在于触发来源、持续时间、是否锁输入、是否能被打断。
面试高分思路
不要分别写三套乱改 transform.position 的逻辑。更好的设计是:
最终位移 = 普通移动 + 冲刺速度 + 翻滚位移 + 击退速度 + 垂直速度再配一个状态机控制优先级:
Knockback > Roll > Dash > Move三者区别
| 动作 | 来源 | 特点 | 常见规则 |
|---|---|---|---|
| 冲刺 Dash | 玩家主动输入 | 短时间高速移动 | 有冷却、锁方向、可消耗体力 |
| 翻滚 Roll | 玩家主动输入 + 动画 | 位移 + 动作表现 | 常有无敌帧、锁输入、可接动画事件 |
| 击退 Knockback | 外部攻击触发 | 被动位移 | 优先级高,通常打断当前动作 |
CharacterController 示例
c
public CharacterController controller;

public float moveSpeed = 5f;
public float dashSpeed = 14f;
public float dashDuration = 0.15f;
public float knockbackDamping = 8f;

private Vector3 dashVelocity;
private Vector3 knockbackVelocity;
private float dashTimer;

void Update()
{
    Vector3 inputDir = new Vector3(Input.GetAxisRaw("Horizontal"), 0, Input.GetAxisRaw("Vertical")).normalized;

    Vector3 moveVelocity = inputDir * moveSpeed;

    if (Input.GetKeyDown(KeyCode.LeftShift) && dashTimer <= 0f)
    {
        Vector3 dashDir = inputDir.sqrMagnitude > 0 ? inputDir : transform.forward;
        dashVelocity = dashDir * dashSpeed;
        dashTimer = dashDuration;
    }

    if (dashTimer > 0f)
    {
        dashTimer -= Time.deltaTime;
    }
    else
    {
        dashVelocity = Vector3.zero;
    }

    knockbackVelocity = Vector3.Lerp(knockbackVelocity, Vector3.zero, knockbackDamping * Time.deltaTime);

    Vector3 finalVelocity = moveVelocity + dashVelocity + knockbackVelocity;
    controller.Move(finalVelocity * Time.deltaTime);
}

public void ApplyKnockback(Vector3 hitFrom, float force)
{
    Vector3 dir = (transform.position - hitFrom).normalized;
    dir.y = 0;
    knockbackVelocity = dir * force;
}翻滚怎么做?
翻滚不建议只写成“另一个冲刺”。它通常还绑定:
c
Roll 状态
锁输入
播放翻滚动画
开启无敌帧
根据动画曲线/根运动移动
结束后恢复普通移动简化版可以这样:
c
if (Input.GetKeyDown(KeyCode.Space) && isGrounded)
{
    state = PlayerState.Roll;
    rollTimer = rollDuration;
    rollDir = inputDir.sqrMagnitude > 0 ? inputDir : transform.forward;
}翻滚期间:
c
rollVelocity = rollDir * rollSpeedCurve.Evaluate(rollTimer / rollDuration);底层原理
冲刺是主动给一个短时间水平速度。
翻滚是“动作状态 + 位移曲线 + 无敌窗口”。
击退是外部冲量,通常随时间衰减:
c
knockbackVelocity = Vector3.Lerp(knockbackVelocity, Vector3.zero, damping * dt);面试可以这样说:
我会把冲刺、翻滚、击退统一抽象成运动状态和额外速度来源,而不是直接到处改坐标。普通移动来自输入,冲刺来自短时间主动速度,翻滚通常由动画状态和位移曲线控制,击退来自外部受击冲量。最终通过状态机决定优先级,再把速度合成后交给 CharacterController 或 Rigidbody 执行。
相机跟随为什么常放在 LateUpdate?
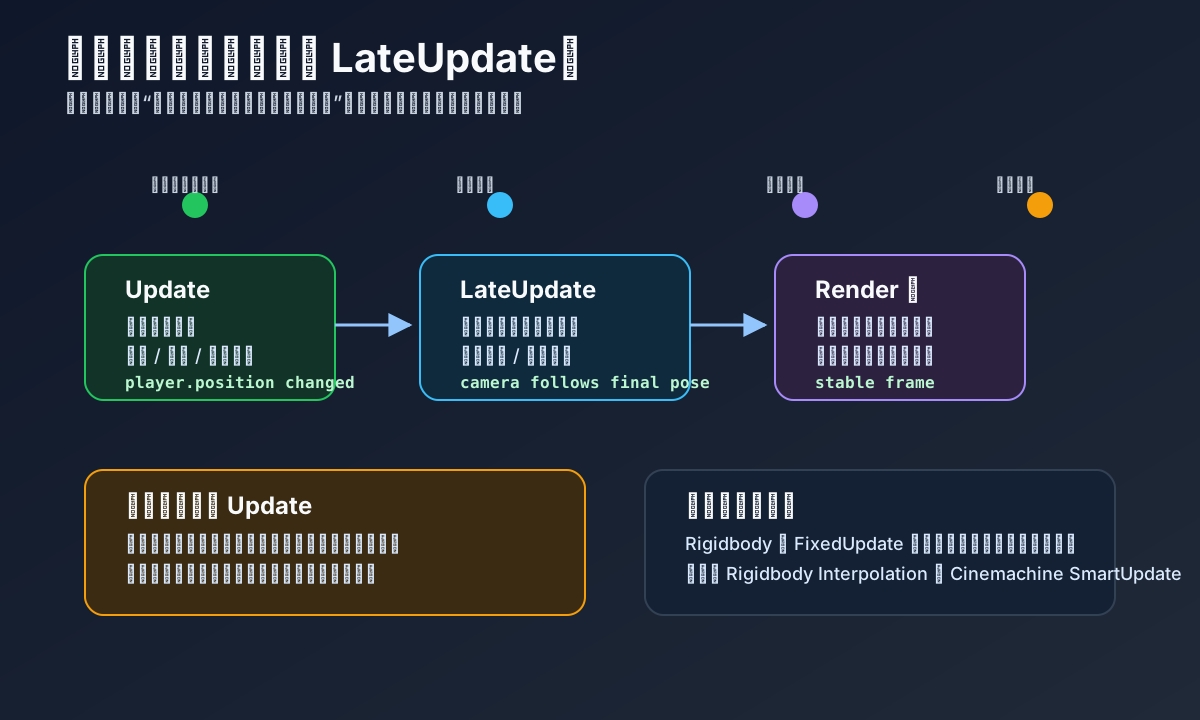
一句话:因为角色通常在 Update 里移动,相机放在 LateUpdate 可以等角色本帧移动完后,再基于最终位置跟随,避免相机慢半拍或抖动。
Unity 一帧里大致是:
c
Update:角色处理输入、移动、转向、动画参数
LateUpdate:相机读取角色最终位置并跟随
Render:用最终相机位置渲染画面如果相机也放在 Update,可能出现执行顺序问题:
c
Camera.Update 先执行:相机跟随旧位置
Player.Update 后执行:角色移动到新位置
Render:画面里相机看到的是上一拍的跟随结果结果就是视觉上相机滞后,尤其在角色高速移动、冲刺、跳跃、转向时更明显。
常见写法:
c
public Transform target;
public Vector3 offset;
public float smooth = 10f;

void LateUpdate()
{
    Vector3 targetPos = target.position + offset;
    transform.position = Vector3.Lerp(
        transform.position,
        targetPos,
        smooth * Time.deltaTime
    );

    transform.LookAt(target);
}和物理的关系
如果角色用 Rigidbody 在 FixedUpdate 里移动,相机依然常放 LateUpdate,但要注意物理帧和渲染帧不同步,可能还需要:
c
Rigidbody Interpolation
Cinemachine Smart Update
相机平滑插值否则也可能出现轻微抖动。
面试可以这样说:
相机跟随放在 LateUpdate,是为了保证角色在 Update 中完成输入、移动、旋转、动画状态更新之后,相机再读取目标的最终 Transform。这样渲染这一帧时,相机和角色的位置是同步的,可以减少跟随滞后和抖动。对于 Rigidbody 角色,还要考虑 FixedUpdate 与渲染帧不同步,通常配合插值或 Cinemachine 的更新策略。
如何做第三人称相机?
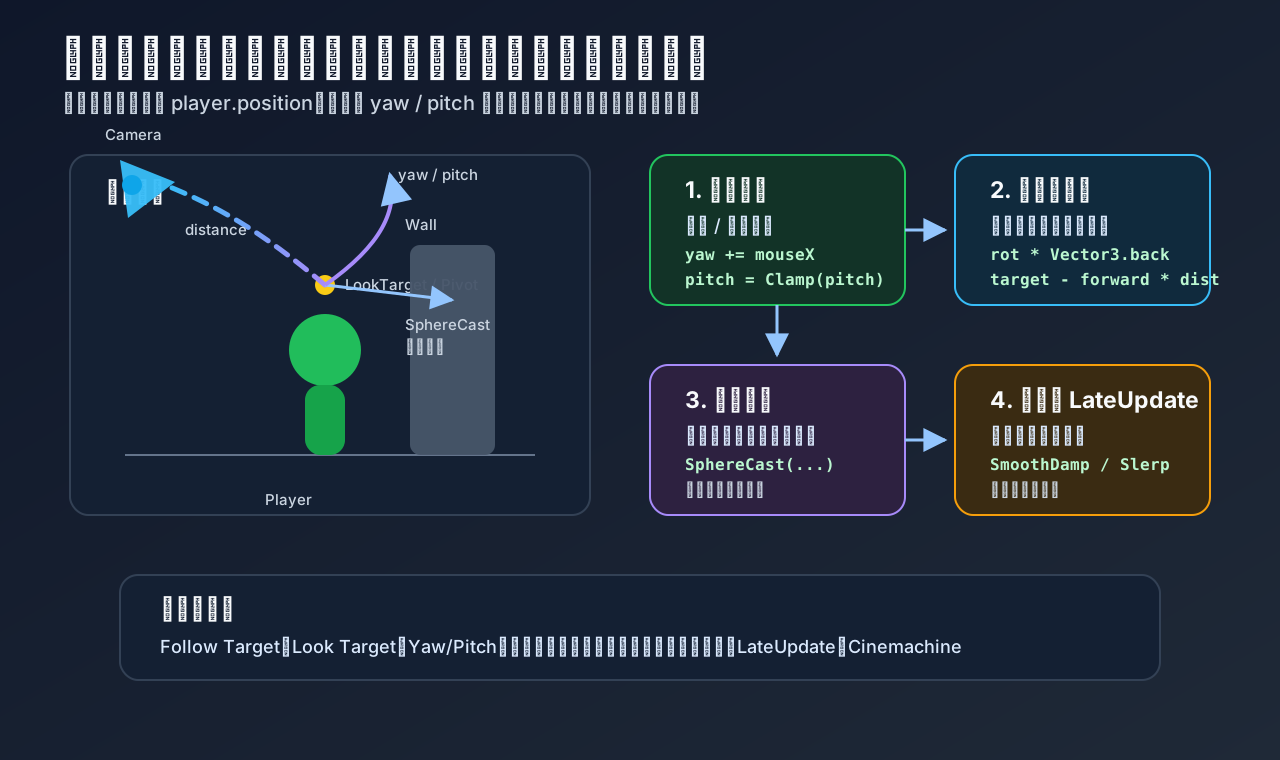
一句话:第三人称相机不是简单 camera.position = player.position + offset,而是围绕角色目标点旋转,保持一定距离,处理遮挡,再做平滑跟随。
核心结构
c
玩家 Transform
    ↑
LookTarget / Pivot:通常在胸口、头部附近
    ↑
Camera:根据 yaw / pitch / distance 算出来核心流程:
c
读取输入 → 更新 yaw/pitch → 计算理想相机位置 → 检测墙体遮挡 → 平滑移动 → 看向目标点简化代码
c
public Transform target;
public Vector3 targetOffset = new Vector3(0, 1.6f, 0);

public float distance = 4f;
public float sensitivity = 2f;
public float minPitch = -30f;
public float maxPitch = 60f;
public float smoothTime = 0.08f;
public LayerMask collisionMask;

private float yaw;
private float pitch;
private Vector3 velocity;

void LateUpdate()
{
    yaw += Input.GetAxis("Mouse X") * sensitivity;
    pitch -= Input.GetAxis("Mouse Y") * sensitivity;
    pitch = Mathf.Clamp(pitch, minPitch, maxPitch);

    Quaternion rotation = Quaternion.Euler(pitch, yaw, 0);
    Vector3 lookPoint = target.position + targetOffset;

    Vector3 desiredDir = rotation * Vector3.back;
    Vector3 desiredPos = lookPoint + desiredDir * distance;

    float finalDistance = distance;

    if (Physics.SphereCast(
        lookPoint,
        0.25f,
        desiredDir,
        out RaycastHit hit,
        distance,
        collisionMask))
    {
        finalDistance = hit.distance - 0.1f;
    }

    Vector3 finalPos = lookPoint + desiredDir * finalDistance;

    transform.position = Vector3.SmoothDamp(
        transform.position,
        finalPos,
        ref velocity,
        smoothTime
    );

    transform.rotation = Quaternion.LookRotation(lookPoint - transform.position);
}为什么放 LateUpdate?
角色一般在 Update 里移动、转向、切动画状态。相机放 LateUpdate,可以等角色本帧位置确定后再跟随,减少抖动和慢半拍。
关键细节
yaw 控制水平环绕,pitch 控制上下俯仰。
pitch 必须限制,否则镜头会翻到角色脚底或头顶。
用 SphereCast 比 Raycast 更稳,因为相机有体积感,不容易贴墙穿模。
不要直接把相机作为角色子物体后固定偏移,否则角色旋转、动画抖动、碰撞遮挡都会影响镜头体验。
项目里更常用 Cinemachine,因为它已经封装了跟随、旋转、阻尼、碰撞、噪声、镜头切换等功能。
面试可以这样说:
第三人称相机我会拆成 Follow Target 和 Look Target。输入控制 yaw 和 pitch,再根据旋转和距离算出理想相机位置;然后从目标点到相机做 SphereCast 处理遮挡,最后在 LateUpdate 里平滑移动并看向目标点。实际项目中如果没有特殊需求,我会优先使用 Cinemachine,因为它对阻尼、碰撞、镜头切换和相机状态管理支持更成熟。
如何做屏幕坐标和世界坐标转换?
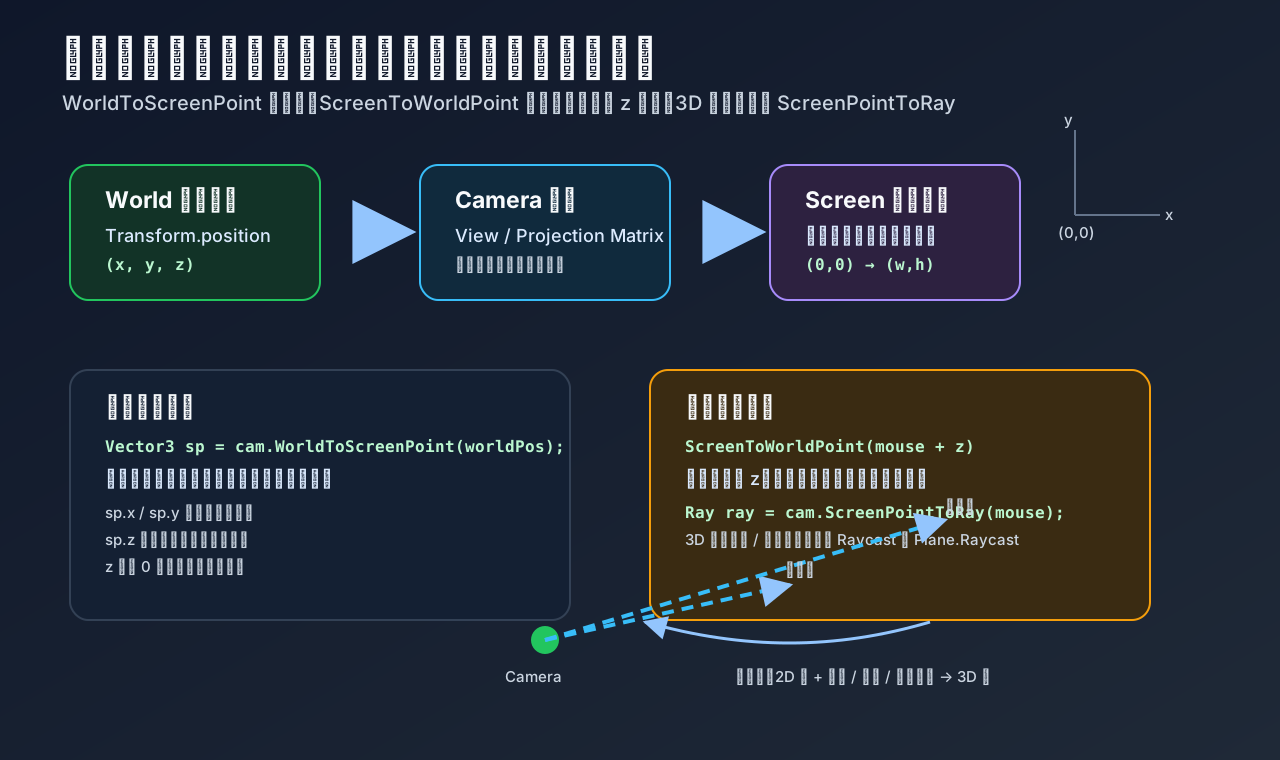
一句话:世界坐标转屏幕坐标是相机投影;屏幕坐标转世界坐标是反投影,必须提供深度或用射线打到某个平面/碰撞体。
坐标区别
| 坐标 | 含义 | 常见 API |
|---|---|---|
| 世界坐标 | 物体在 3D 世界中的位置 | transform.position |
| 屏幕坐标 | 屏幕像素位置,左下角是 (0, 0) | Input.mousePosition |
| 视口坐标 | 归一化屏幕坐标,范围 0~1 | WorldToViewportPoint |
世界坐标 → 屏幕坐标
常用于:头顶血条、名字、任务标记、伤害数字。
c
Vector3 screenPos = Camera.main.WorldToScreenPoint(target.position);

if (screenPos.z > 0)
{
    uiElement.position = screenPos;
}注意:screenPos.z > 0 表示目标在相机前方;如果小于 0,说明在相机背后。
屏幕坐标 → 世界坐标
如果你直接写:
c
Vector3 world = Camera.main.ScreenToWorldPoint(Input.mousePosition);通常是错的,因为 Input.mousePosition 只有 x/y,没有真正的世界深度。
正确方式之一:补一个距离相机的深度。
c
Vector3 mouse = Input.mousePosition;
mouse.z = 10f;

Vector3 world = Camera.main.ScreenToWorldPoint(mouse);但在 3D 游戏里,更常用射线:
c
Ray ray = Camera.main.ScreenPointToRay(Input.mousePosition);

if (Physics.Raycast(ray, out RaycastHit hit))
{
    Vector3 worldPoint = hit.point;
}如果是点击地面,可以用数学平面:
c
Ray ray = Camera.main.ScreenPointToRay(Input.mousePosition);
Plane ground = new Plane(Vector3.up, Vector3.zero);

if (ground.Raycast(ray, out float distance))
{
    Vector3 point = ray.GetPoint(distance);
}UI 坐标转换
如果是 UGUI,不要直接混用世界坐标和 RectTransform 坐标。常用:
c
RectTransformUtility.ScreenPointToLocalPointInRectangle(
    rectTransform,
    Input.mousePosition,
    uiCamera,
    out Vector2 localPoint
);面试加分说法
WorldToScreenPoint 的本质是把世界坐标经过相机的 View 矩阵和 Projection 矩阵投影到屏幕像素坐标。反过来,屏幕坐标只有二维信息,一个屏幕点在 3D 世界里对应的是从相机发出的一条射线,所以 ScreenToWorldPoint 必须提供 z 深度;实际做鼠标点击地面或选中物体时,更常用 ScreenPointToRay 配合 Raycast。
Raycast 能做什么?
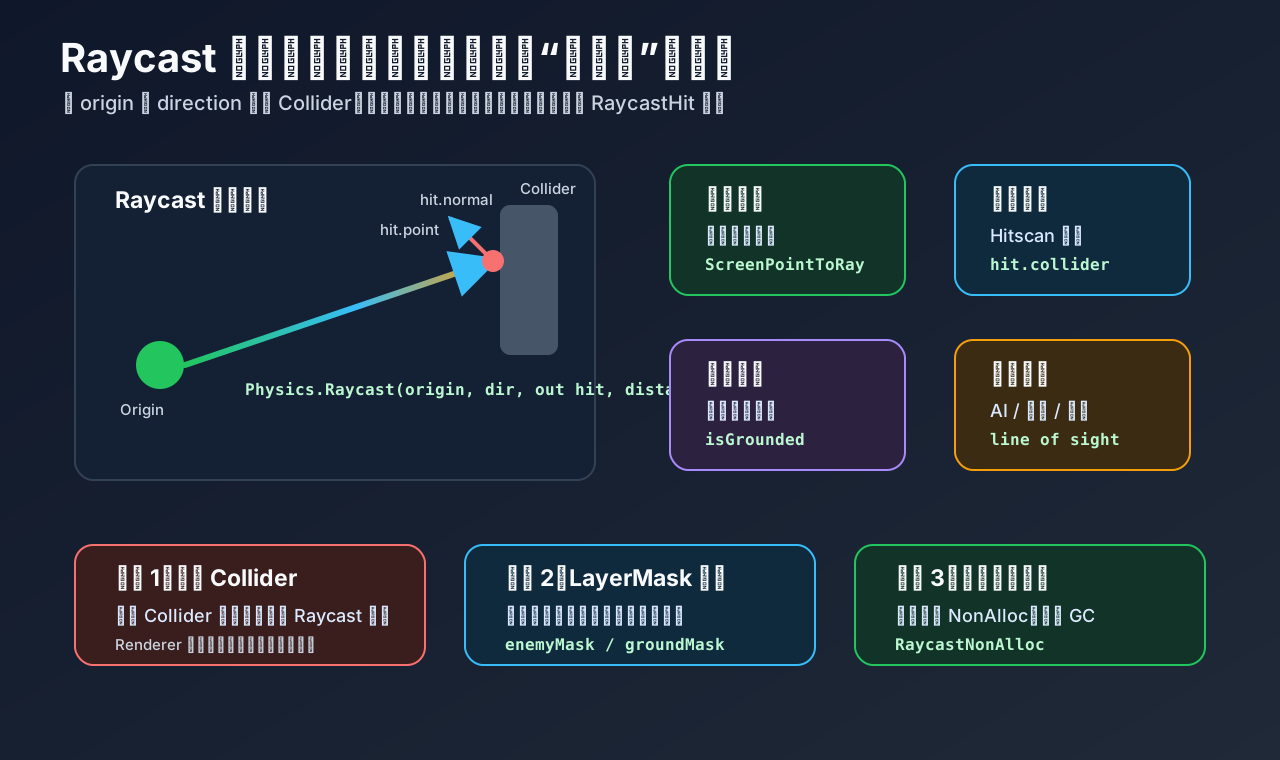
一句话:Raycast 是从一个点沿一个方向发射一条射线,查询这条线上是否碰到 Collider。
能做什么
| 场景 | 用法 |
|---|---|
| 鼠标点击选中 | Camera.ScreenPointToRay + Physics.Raycast |
| 射击命中 | FPS/TPS 的 hitscan 子弹 |
| 地面检测 | 判断角色是否站在地上 |
| 视线检测 | AI 判断玩家是否被遮挡 |
| 交互检测 | 面前是否有 NPC、门、道具 |
| 相机遮挡 | 第三人称相机被墙挡住时拉近 |
| 放置检测 | 建造、技能指示器、鼠标点地面 |
| 墙体检测 | 冲刺、攀爬、贴墙、避障 |
基本写法
c
Ray ray = new Ray(transform.position, transform.forward);

if (Physics.Raycast(ray, out RaycastHit hit, 10f))
{
    Debug.Log(hit.collider.name);
    Debug.Log(hit.point);
    Debug.Log(hit.normal);
}RaycastHit 里常用信息:
c
hit.collider   // 命中的碰撞体
hit.transform  // 命中的物体 Transform
hit.point      // 命中点
hit.normal     // 命中面的法线
hit.distance // 距离射线起点多远鼠标点击物体
c
Ray ray = Camera.main.ScreenPointToRay(Input.mousePosition);

if (Physics.Raycast(ray, out RaycastHit hit, 100f))
{
    GameObject selected = hit.collider.gameObject;
}地面检测
c
bool grounded = Physics.Raycast(
    transform.position,
    Vector3.down,
    1.1f,
    groundMask
);角色项目里更稳的做法通常是 SphereCast 或脚底多个射线,因为单条线容易在台阶、斜坡边缘误判。
射击命中
c
Ray ray = new Ray(cameraTransform.position, cameraTransform.forward);

if (Physics.Raycast(ray, out RaycastHit hit, weaponRange, enemyMask))
{
    IDamageable target = hit.collider.GetComponent<IDamageable>();
    target?.TakeDamage(damage);
}底层理解
Raycast 查询的是 Unity 物理世界里的 Collider,不是 MeshRenderer。也就是说:模型看得见,不代表能被射线打到;必须有 Collider。
物理引擎会根据射线、最大距离、LayerMask、Trigger 设置,在物理场景里找命中的碰撞体,并返回最近命中的信息。
常见坑
不要忘了 LayerMask,否则可能打到自己、UI、特效碰撞体或无关物体。
RaycastAll 会返回多个命中,但结果顺序不要依赖,通常需要自己按 distance 排序。
高频大量检测可以用:
c
Physics.RaycastNonAlloc(ray, results, distance, layerMask);减少 GC Alloc。
面试可以这样说:
Raycast 本质是一次物理查询,从某个起点沿方向检测 Collider。它常用于点击选中、射击命中、地面检测、AI 视线和交互检测。实际项目里我会配合 LayerMask、最大距离、Trigger 策略使用;如果需要体积检测,会改用 SphereCast 或 CapsuleCast;如果是高频多命中检测,会用 NonAlloc 版本减少 GC。
新输入系统和旧输入系统区别是什么?
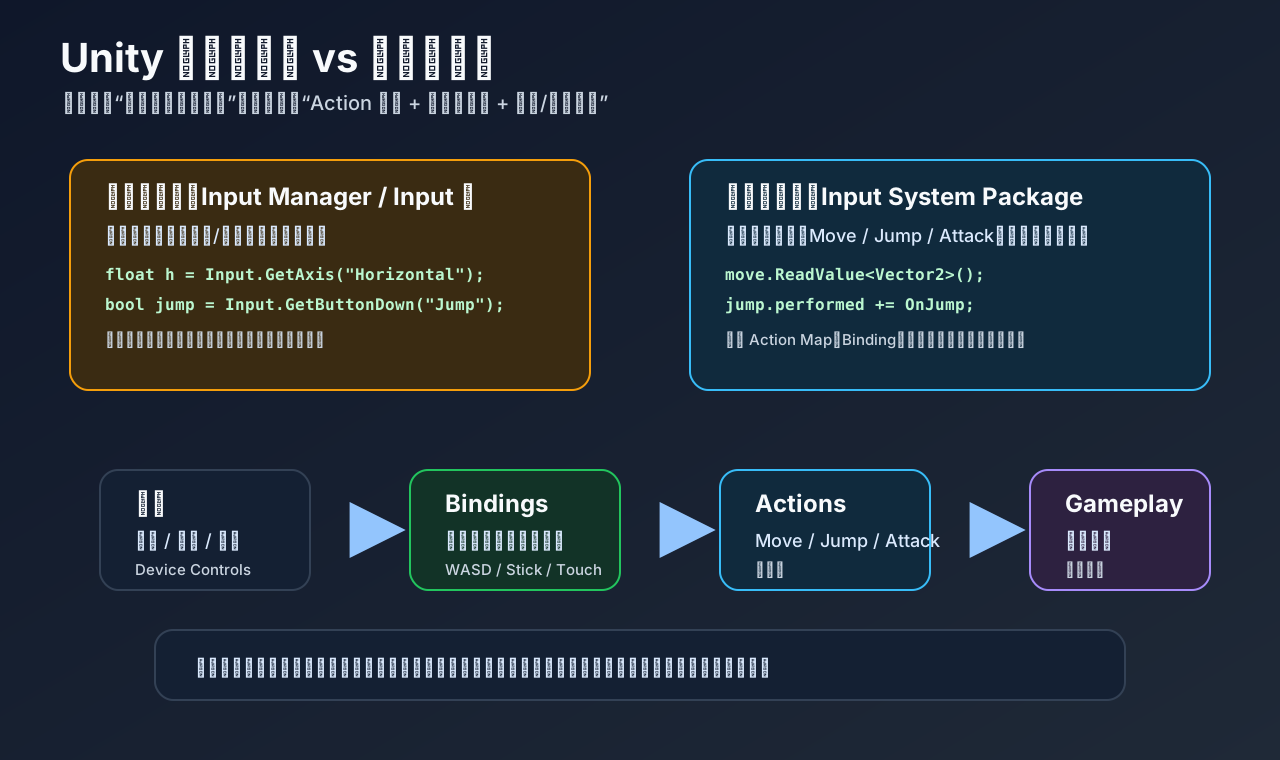
一句话:旧输入系统是直接轮询设备状态;新输入系统是用 Action 抽象输入意图。
| 对比 | 旧输入系统 Input | 新输入系统 Input System |
|---|---|---|
| 思路 | 代码问“某个键/轴现在怎样” | 代码关心“Move / Jump / Attack 动作” |
| 配置 | Input Manager 里配置轴和按钮 | .inputactions 配置 Action Map / Action / Binding |
| 调用 | Input.GetAxis / Input.GetKeyDown | InputAction.ReadValue / 回调事件 |
| 设备支持 | 能用,但扩展麻烦 | 键鼠、手柄、触屏、多设备更统一 |
| 改键 | 自己做比较多 | 内置 Rebinding 支持更好 |
| 本地多人 | 麻烦 | PlayerInput / PlayerInputManager 更方便 |
| 适合 | 老项目、小 Demo、简单输入 | 新项目、多平台、复杂输入、手柄、本地多人 |
旧输入系统:
c
void Update()
{
    float h = Input.GetAxis("Horizontal");

    if (Input.GetButtonDown("Jump"))
    {
        Jump();
    }
}新输入系统:
c
public InputAction moveAction;
public InputAction jumpAction;

void OnEnable()
{
    moveAction.Enable();
    jumpAction.Enable();

    jumpAction.performed += OnJump;
}

void OnDisable()
{
    jumpAction.performed -= OnJump;

    moveAction.Disable();
    jumpAction.Disable();
}

void Update()
{
    Vector2 move = moveAction.ReadValue<Vector2>();
}

void OnJump(InputAction.CallbackContext ctx)
{
    Jump();
}底层理解
旧输入系统更像是:
c
键盘 / 手柄状态 → Input 类 → 每帧轮询新输入系统更像是:
c
设备输入 → Binding → Action → 业务逻辑也就是说,新系统把“具体按键”和“游戏行为”解耦了。比如 Jump 可以绑定到:
c
键盘 Space
手柄 South Button
触屏按钮代码里仍然只处理 Jump 这个动作。
常见误区
新输入系统不是只能事件回调,也可以轮询:
c
Vector2 move = moveAction.ReadValue<Vector2>();旧输入系统也不是完全不能用手柄,只是复杂设备、多套控制方案、运行时改键、本地多人会更麻烦。
面试加分说法
旧输入系统是基于 Input 类的轮询模型,代码直接读取按键和轴,简单但和设备绑定较紧。新输入系统用 Action、Binding、Control Scheme 做了一层抽象,业务代码关心的是 Move、Jump 这类输入意图,而不是具体按键,因此更适合多平台、多设备、改键和本地多人。实际项目中老项目可以继续用旧系统,新项目我会优先考虑新输入系统。
参考:Unity 官方 Input System package / Input Manager