
Appearance
新版输入系统
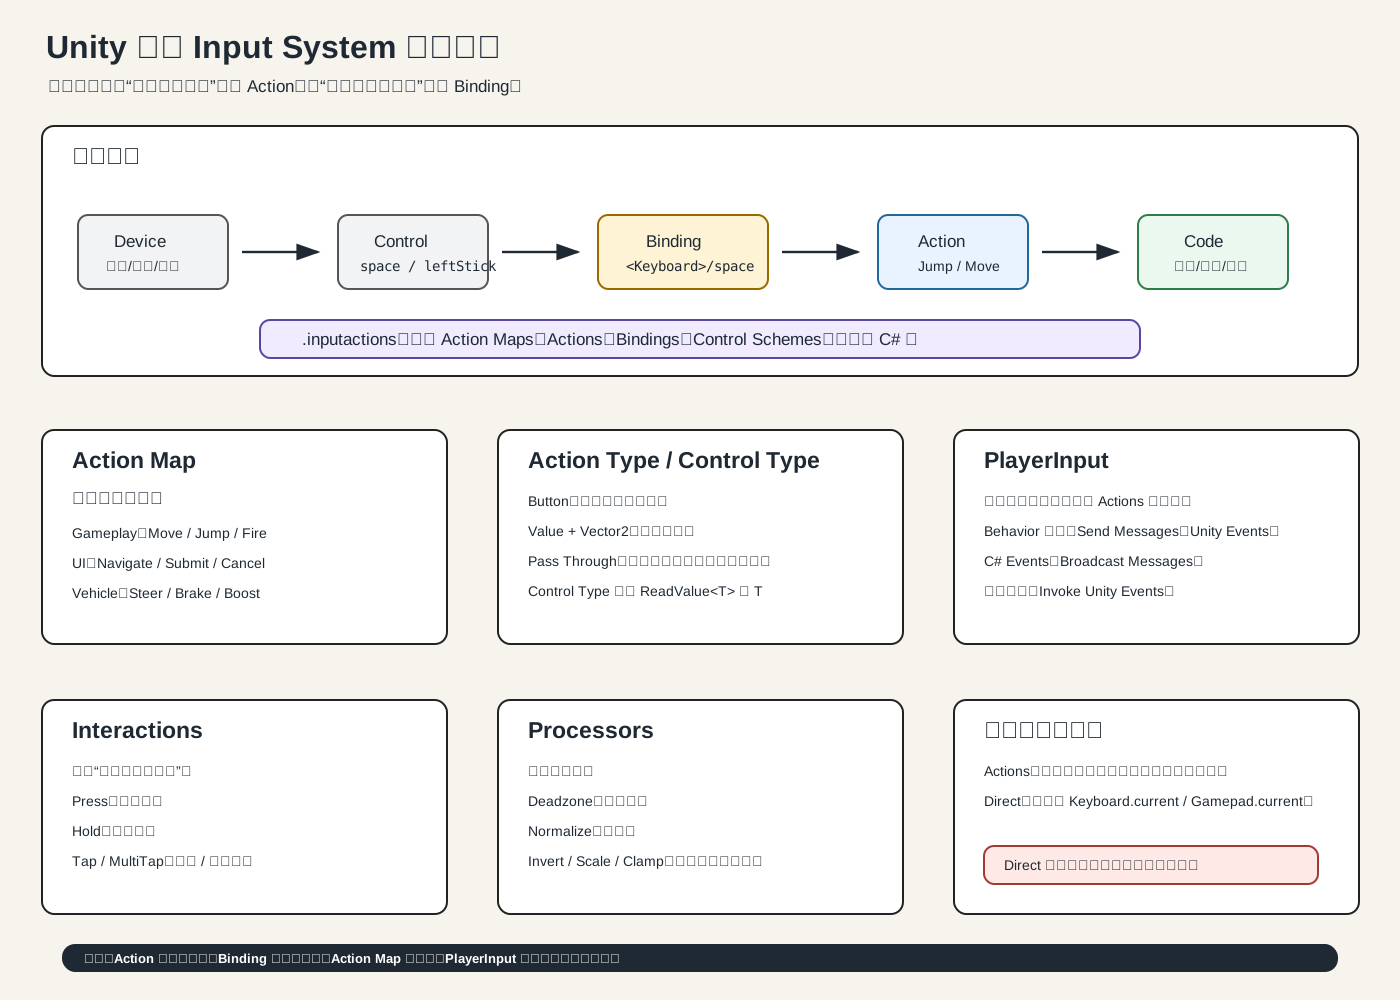
一句话理解
新版 Input System 不再让代码直接问:
玩家是不是按了 W?
玩家是不是按了空格?而是改成问:
玩家是否触发了 Move?
玩家是否触发了 Jump?
玩家是否触发了 Fire?也就是:
c
旧版:按键驱动
新版:动作驱动核心结构
你要记住这条链:
c
Device -> Control -> Binding -> Action -> Action Map -> PlayerInput -> 代码意思是:
c
Device:设备,比如 Keyboard、Mouse、Gamepad
Control:设备上的控件,比如 space、leftStick、leftButton
Binding:绑定,比如 <Keyboard>/space
Action:动作,比如 Jump、Move、Fire
Action Map:动作组,比如 Gameplay、UI、Vehicle
PlayerInput:把输入动作发给玩家脚本官方当前 latest 文档指向 Input System 1.20.0。Unity 文档也明确说,Actions 的意义是把“输入目的”和“具体设备控件”分离。
最推荐的新手用法:PlayerInput + Input Actions
- 创建输入资产:
c
Assets > Create > Input Actions命名:
c
PlayerControls.inputactions打开它,创建 Action Map:
c
Gameplay在 Gameplay 里创建 Actions:
c
Move   Value / Vector2
Jump   Button
Fire   Button
Look   Value / Vector2
Pause Button给 Move 加绑定:
c
2D Vector Composite
Up: W
Down: S
Left: A
Right: D再加:
c
<Gamepad>/leftStick- 给
Jump加绑定:
c
<Keyboard>/space
<Gamepad>/buttonSouth- 玩家物体上添加组件:
c
PlayerInput设置:
c
Actions: PlayerControls
Default Map: Gameplay
Behavior: Invoke Unity Events移动案例
c
using UnityEngine;
using UnityEngine.InputSystem;

public class PlayerController : MonoBehaviour
{
    [SerializeField] private float moveSpeed = 5f;

    private Vector2 moveInput;

    public void OnMove(InputAction.CallbackContext context)
    {
        moveInput = context.ReadValue<Vector2>();
    }

    public void OnJump(InputAction.CallbackContext context)
    {
        if (!context.performed) return;

        Debug.Log("Jump");
    }

    private void Update()
    {
        Vector3 move = new Vector3(moveInput.x, 0f, moveInput.y);
        transform.Translate(move * moveSpeed * Time.deltaTime, Space.World);
    }
}然后在 PlayerInput 的 Unity Events 里绑定:
c
Gameplay / Move -> PlayerController.OnMove
Gameplay / Jump -> PlayerController.OnJump重点:Move 是持续值,不要只在 performed 里移动一次。正确做法是保存 moveInput,再在 Update 里持续移动。
started、performed、canceled
新版输入动作有阶段:
c
started:开始触发
performed:触发成功
canceled:结束或取消跳跃通常只看:
c
if (context.performed)
{
    Jump();
}蓄力攻击可能这样用:
c
started:开始蓄力
performed:蓄力完成并释放
canceled:松开太早,取消蓄力Interactions 和 Processors
Interactions 决定“怎么按才算触发”:
c
Press:普通按下
Hold:长按
Tap:短按
MultiTap:多次点击Processors 决定“输入值怎么处理”:
c
Deadzone:摇杆死区
Normalize:归一化
Invert:反转
Scale:缩放
Clamp:限制比如视角上下反了,可以给 Look 的 Y 轴加反转处理。
Action Map 的意义
不要所有输入都塞在一组里。推荐:
c
Gameplay:Move、Jump、Fire、Look
UI:Navigate、Submit、Cancel
Vehicle:Steer、Brake、Boost暂停时切换:
c
using UnityEngine;
using UnityEngine.InputSystem;

public class InputModeSwitcher : MonoBehaviour
{
    [SerializeField] private PlayerInput playerInput;

    public void OpenMenu()
    {
        playerInput.SwitchCurrentActionMap("UI");
    }

    public void CloseMenu()
    {
        playerInput.SwitchCurrentActionMap("Gameplay");
    }
}直接读设备,适合小测试
c
using UnityEngine;
using UnityEngine.InputSystem;

public class DirectInputTest : MonoBehaviour
{
    private void Update()
    {
        if (Keyboard.current.spaceKey.wasPressedThisFrame)
        {
            Debug.Log("Space");
        }

        if (Mouse.current.leftButton.wasPressedThisFrame)
        {
            Debug.Log("Left click");
        }

        Vector2 mousePosition = Mouse.current.position.ReadValue();
    }
}这种方式简单,但不适合正式项目,因为键位写死,后面不好支持手柄、改键、多平台。
最常见错误
c
忘记 using UnityEngine.InputSystem
Action 没有 Enable,手写 InputAction 时尤其常见
Move 设置成 Button,却用 ReadValue<Vector2>()
PlayerInput 没拖 .inputactions
Default Map 没选 Gameplay
UI 还在用 Standalone Input Module
移动逻辑只写在 performed 里,导致角色只动一下
旧版 Input.GetAxis 和新版 InputSystem 混用导致报错你现在的学习顺序
c
1. 会创建 .inputactions
2. 会建 Gameplay / Move / Jump / Fire
3. 会用 PlayerInput 调用脚本
4. 会区分 Button 和 Value
5. 会 ReadValue<Vector2>()
6. 会切换 Action Map
7. 再学 Interactions、Processors、Control Schemes、改键记住这句就稳了:
c
Action 写游戏意图,Binding 写设备按法,PlayerInput 把动作送到代码。参考:Unity 官方 Input System 1.20.0、Actions、Input Action Assets、Bindings、PlayerInput、PlayerInput Behavior。